I was motivated to write this article because during my inspections this summer I was asked many questions regarding buckled and squeaky floors, rotted wood, moisture, etc. So, I have outlined several issues below, which I am sure you have all experienced personally or professionally. I would like to share some relative information and experience to try and shed some light on Wood Flaws and Characteristics.
Wood Characteristics
What I’m about to say isn’t anything you don’t know already, but for the purpose of trying to convey the full picture in this quick article, I thought it would be useful:
Wood Absorbs Moisture!
Wood has many interesting characteristics. It’s hygroscopic, meaning that it absorbs water like a sponge and swells in damp conditions and then releases water again when the air dries and the temperature rises. If your home has wooden type windows, you’ll probably notice that they open much easier in the summer than during winter months. Colder, damp outdoor conditions make wood swell into the frames which it makes it harder to open.
What about interior floors? I just inspected a newly constructed house this summer where the floors appeared buckled. Since this house was built with a crawlspace I assumed the crawlspace was damp and therefore the wood floor at the main level absorbed the moisture and swelled. However, the following two observations were made:
1- The crawlspace was dry and ventilated properly
2- The second floor level flooring also experienced cupped or ” wavy ” floors ( In this case, we wouldn’t think of wood swelling at second floor levels since it is far enough above the presumed damp crawlspace )
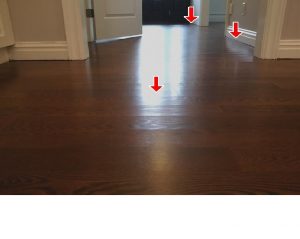
So, the conclusion was; how can the first and second floor wood flooring be cupped if we think the origin is from a damp crawlspace. Please review the photo, although the cupped floors may not look as bad in the photo, an on-site visit would tell us otherwise. After reviewing this for awhile and discussing this issue with the builder, installer and manufacturer, it was concluded that the floors will relax once it drys out during cooler months when the heating system is being used. My final conclusion was that this wood flooring may have been stored in a moist environment at the supply yard and did not have time to properly dry out before installation. Just so you know, the builder, installer and manufacturer guaranteed the wood floor would flatten out or it would be replaced or sanded and stained again.
Many of you may not know this, but in addition to the thousands of property and home inspections I have personally conducted and thousands of others that I have supervised, I have built Dozens of high end residential new homes and additions as well as commercial buildings (100,000 s.f +/- ). This allowed me to experience a wide array of issues and successes regarding materials, workmanship, design, etc. Being a 20 + year veteran and second generation in this business, the knowledge obtained formally and through experience is not something you can teach very quickly and easily but I will always try! Please visit my website for more information or call me if you need more info.( Please Visit
)
So, with that in mind, when it comes to flooring I always let my flooring materials acclimate to the interior climate for as long as possible before installing. Many times this will allow the wood to dry out before installation and finishing. Barring installation issues, this will reduce cupping, warping, buckling, etc. And just so you know, after my discussions with this builder, whom I thought was very good, it appears all the right steps were taken and parameters met for proper flooring installation. Although, there could be an installation problem here, I have no reason to suspect that. As the old cliche goes “Only Time Shall Tell “. We shall see!!
“SQUEAKY FLOORS”
Squeaky Floors, now that’s something most of us have experienced!
In most cases you will not hear many squeaky floors in new construction. However, most squeaks occur as a result of the normal cycle of seasonal contraction and expansion. Typically squeaks are created because the sub-floor is not properly fastened to joists. As a personal example, in one of the houses I built for myself, I could not get rid of a squeak located in a 3 foot by 3 foot area in the kitchen by my island. Of course I was scratching my head because I did everything right. But sometimes when the substrate is installed over glue, the glue is uneven and dries that way. So my remedy was to get in between the joists and sub-floor from below with wood adhesive, like liquid nails or PL400, and then screw off this area from the top ( finished floor was not installed yet). I used so many screws I thought it was going to weaken the wood. To say the least, it drove me crazy to repair but it was worth it. Let me give you some examples of How I install sub-flooring followed by some “squeaky floor” repairs.
– I always glue and screw ( not glue and nail ) the plywood substrate to the joists. This will typically help stop much of the movement inherent in wood and help fill any voids between the plywood and joists. Writing from experience, note that in new construction and during extreme cold months where the heat is not functional yet, this adhesive could create voids
“TIPS ON STOPPING THAT SQUEAKY FLOOR”
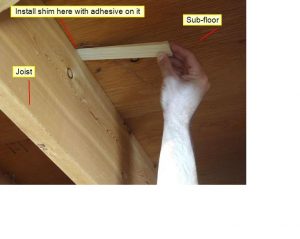
*If you have access from the floor beneath the squeak and it is a small area install a wood shim with adhesive between the sub-floor and the joist. (having access to these areas makes it much easier.) See Photo Below
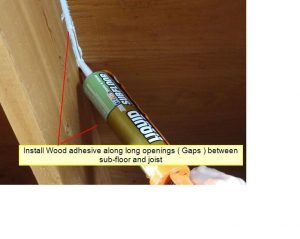
*If the gap runs long on the joist, I would just insert liquid adhesive along the gap and wait for it to dry
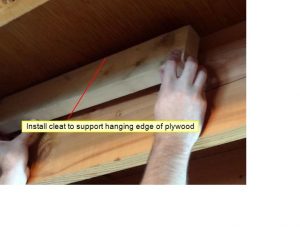
*Sometimes installers miss the joist’s edge with the sub-floor edge leaving small sections of the sub-floor floating or not secured properly (wood shrinkage could also do this). In this case, if you have access, install a cleat along side or perpendicular to the joist. (which ever one works to secure the floating seam or end of substrate). Now, using proper sized screws, so you do not screw through the finished floor, you can screw and glue this area from beneath. But if you feel uncomfortable screwing this area, simply glue it using procedures above.
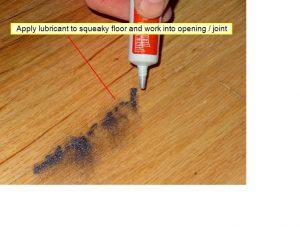
*Eliminating or reducing squeaks at stairs or floors that do not have access beneath can be difficult to repair without removing finishes to get to these areas. So, when wooden floorboards are causing the squeak you should try a lubricant such as talcum powder, graphite or soapstone and work it into the area of the squeaky floor or steps. As limited as it sounds, it does work.. just repeat as necessary. However, I have found that in most cases steps will need to be repaired from beneath. ( NOTE: Most finishes are just gypsum board which can be easily cut and repaired )
ONE LAST IMPORTANT NOTE ON MOISTURE AND WOOD…
Did you know that wood is most vulnerable to rot attack when the moisture content is above 20% ?
Did you know that air would need to be present for wood rot to occur ?
Did you know that wood continuously submerged in water with no air present will rot very slowly or not at all?
I would like to prove this theory by giving you an actual example:
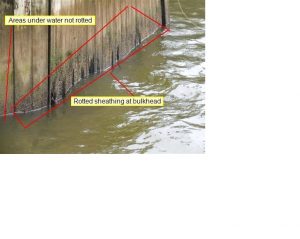
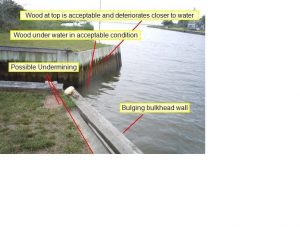
I recently inspected a waterfront house in the Hamptons (Yes we not only inspect in NYC, Westchester, Putnam, Dutchess and Connecticut’s Fairfield Counties, we go there too) and as you can see from the following photos, wood rot is very prevalent at the barnacle line were the water fluctuates from low tide to high tide. That’s because the moisture level is above 20% and this area is exposed to air at various time of the day ( low Tide ). The wood at the top of the bulkhead wall was still in tact as was the very lower part of the bulkhead wall that was continuously submerged under water… Isn’t that a physical phenomenon !!!
I hope you enjoyed reading this as much as I did writing it.
As always, if you or your clients need our services please do not hesitate to call. I hope all is well and hope to see you at the next inspection.